
Pineapple Bliss Bars combine buttery crust, creamy filling, and sweet pineapple flavor into one easy dessert that tastes bright and refreshing. These soft dessert bars come together with simple pantry ingredients, yet they deliver bakery-style results every time. Whether you need a quick party dessert, a sweet summer treat, or a make-ahead option for family gatherings, Pineapple Bliss Bars fit perfectly. The smooth filling balances the fruit flavor beautifully, while the crust adds a rich texture that keeps every bite satisfying. Because these bars chill well and slice cleanly, they also work wonderfully for potlucks, holidays, and weekend baking sessions.
Story
The first time I made Pineapple Bliss Bars, I wanted something lighter than heavy chocolate desserts but still rich enough to feel special. After testing different fillings and crust styles, this recipe quickly became a favorite because it delivers tropical flavor without complicated steps. The sweet pineapple filling stays creamy while the buttery crust creates the perfect contrast. These tropical sweetness bars also taste wonderful year-round, although they truly shine during spring and summer gatherings. Since Pineapple Bliss Bars travel well and slice neatly, I often prepare them ahead for birthdays, cookouts, and casual family dinners when I need a dependable dessert everyone enjoys.
Ingredients
- 1 cup all-purpose flour
- ½ cup granulated sugar
- ½ cup unsalted butter, softened
- 1 can (15 ounces) crushed pineapple, thoroughly drained
- 1 cup sour cream
- ½ cup granulated sugar
- 2 large eggs
- 1 teaspoon vanilla extract
- Powdered sugar for dusting
Step-by-Step Instructions
Preparing the Ingredients
Preheat the oven to 350°F and grease a 9×13-inch baking pan lightly. In a medium bowl, mix the flour and sugar for the crust before cutting in the softened butter until coarse crumbs form evenly. Press the mixture firmly into the prepared pan so the crust bakes evenly. Bake the crust for about 15 minutes until lightly golden. Meanwhile, drain the crushed pineapple very well because extra liquid can soften the crust too much. In another bowl, whisk together the pineapple, sour cream, sugar, eggs, and vanilla until smooth and creamy for the filling.
Cooking Instructions
Pour the pineapple filling evenly over the warm crust and spread it gently to cover the entire pan. Return the pan to the oven and bake for 25 to 30 minutes until the center looks set and the edges turn lightly golden. Allow the bars to cool completely before slicing because this helps the filling firm properly. Once cooled, dust the top lightly with powdered sugar for a beautiful finish. These creamy filling bars taste even better after chilling for a short time because the flavors blend together beautifully while the texture becomes smoother.
Tips for Perfect Results
Common Mistakes to Avoid
The biggest mistake when making Pineapple Bliss Bars comes from not draining the pineapple fully. Excess liquid creates a soggy crust and prevents the filling from setting correctly. Another issue comes from overbaking, which can dry the filling and reduce the creamy texture. Always watch the center carefully and remove the bars once the filling looks set with only slight movement. In addition, avoid slicing the dessert while warm because the bars need time to cool completely for clean cuts. Using softened butter also matters because cold butter will not combine evenly into the crust mixture.
Pro Tips for Better Flavor
For richer flavor, chill the bars before serving because the pineapple filling becomes even creamier after resting in the refrigerator. You can also add a small amount of lemon zest to brighten the tropical flavor naturally without overpowering the dessert. Some bakers like adding toasted coconut on top for extra texture, while others prefer a light drizzle of vanilla glaze. Since these pineapple dessert squares balance sweetness and tanginess well, they pair beautifully with whipped cream or fresh fruit. Using real vanilla extract instead of imitation flavoring also gives the filling a warmer and smoother taste.
Serving and Storage
How to Serve
Serve Pineapple Bliss Bars chilled or slightly cool for the best texture and flavor. These bars work beautifully for brunch tables, baby showers, holiday trays, and casual backyard dinners because they feel light yet satisfying. For an elegant dessert plate, add fresh pineapple slices or whipped cream beside each serving. Since the bars slice neatly into squares, they also make excellent party desserts that guests can grab easily. Their creamy filling and buttery crust pair especially well with coffee, iced tea, or tropical fruit drinks during warm-weather gatherings and celebrations.

How to Store Leftovers
Store leftover Pineapple Bliss Bars in an airtight container inside the refrigerator for up to five days. Because the filling contains sour cream and eggs, refrigeration keeps the texture fresh and safe for serving later. Place parchment paper between layers if stacking the bars to prevent sticking. You can also freeze the bars for longer storage by wrapping individual pieces tightly before placing them in a freezer-safe container. When ready to enjoy, thaw the bars overnight in the refrigerator for the best texture. These easy fruit bars stay creamy and flavorful even after chilling.
Conclusion
Pineapple Bliss Bars bring together tropical pineapple flavor, creamy filling, and buttery crust in one simple dessert that works for nearly any occasion. The recipe uses basic ingredients, straightforward steps, and reliable baking methods, which makes it perfect for beginner bakers and experienced dessert lovers alike. Since the bars store well and slice beautifully, they also make excellent make-ahead treats for gatherings and celebrations. Every bite delivers refreshing pineapple flavor balanced by rich texture, creating a dessert that feels comforting yet bright. Once you try these Pineapple Bliss Bars, they may quickly become a regular favorite in your dessert rotation.
Discover more delicious recipes by following me on Facebook and Pinterest.
Frequently Asked Questions
Can I use fresh pineapple instead of canned pineapple?
Yes, you can use fresh pineapple if you crush it finely and drain it thoroughly before mixing it into the filling. Fresh pineapple gives the bars a slightly brighter flavor, although canned pineapple provides more consistent sweetness and texture for baking.
Can I make Pineapple Bliss Bars ahead of time?
Absolutely. Pineapple Bliss Bars actually taste better after chilling because the filling firms up and the flavors blend together more fully. You can prepare them one day ahead and store them covered in the refrigerator until serving time.
Can I make these bars gluten-free?
Yes, you can replace the all-purpose flour with a gluten-free baking blend that works for one-to-one substitution. The texture may change slightly, but the bars still hold together well and maintain their creamy filling.
Print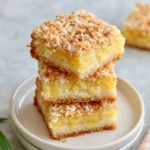
Pineapple Bliss Bars
- Total Time: 1 hour
- Yield: 24 bars 1x
- Diet: Vegetarian
Description
Tropical Pineapple Bliss Bars combine buttery crust, creamy pineapple filling, and refreshing flavor in every bite.
Ingredients
- 1 cup all-purpose flour
- 1/2 cup granulated sugar
- 1/2 cup unsalted butter, softened
- 1 can (15 oz) crushed pineapple, thoroughly drained
- 1 cup sour cream
- 1/2 cup granulated sugar
- 2 large eggs
- 1 teaspoon vanilla extract
- Powdered sugar for dusting
Instructions
- Preheat the oven to 350°F and grease a 9×13-inch baking pan.
- Mix the flour and sugar for the crust in a medium bowl.
- Cut in the softened butter until coarse crumbs form.
- Press the crust mixture evenly into the prepared baking pan.
- Bake the crust for 15 minutes until lightly golden.
- Drain the crushed pineapple thoroughly.
- Whisk together the pineapple, sour cream, sugar, eggs, and vanilla extract until smooth.
- Pour the filling evenly over the baked crust.
- Bake for 25 to 30 minutes until the filling is fully set.
- Cool the bars completely before slicing.
- Dust with powdered sugar before serving.
Notes
- Drain the pineapple completely to avoid a soggy crust.
- Chill the bars before serving for cleaner slices and better texture.
- Store leftovers in the refrigerator for up to 5 days.
- Prep Time: 15 minutes
- Cook Time: 45 minutes
- Category: Dessert
- Method: Baking
- Cuisine: American
Nutrition
- Serving Size: 1 bar
- Calories: 150
- Sugar: 15
- Sodium: 45
- Fat: 7
- Saturated Fat: 4.5
- Unsaturated Fat: 2
- Trans Fat: 0
- Carbohydrates: 21
- Fiber: 1
- Protein: 2
- Cholesterol: 31