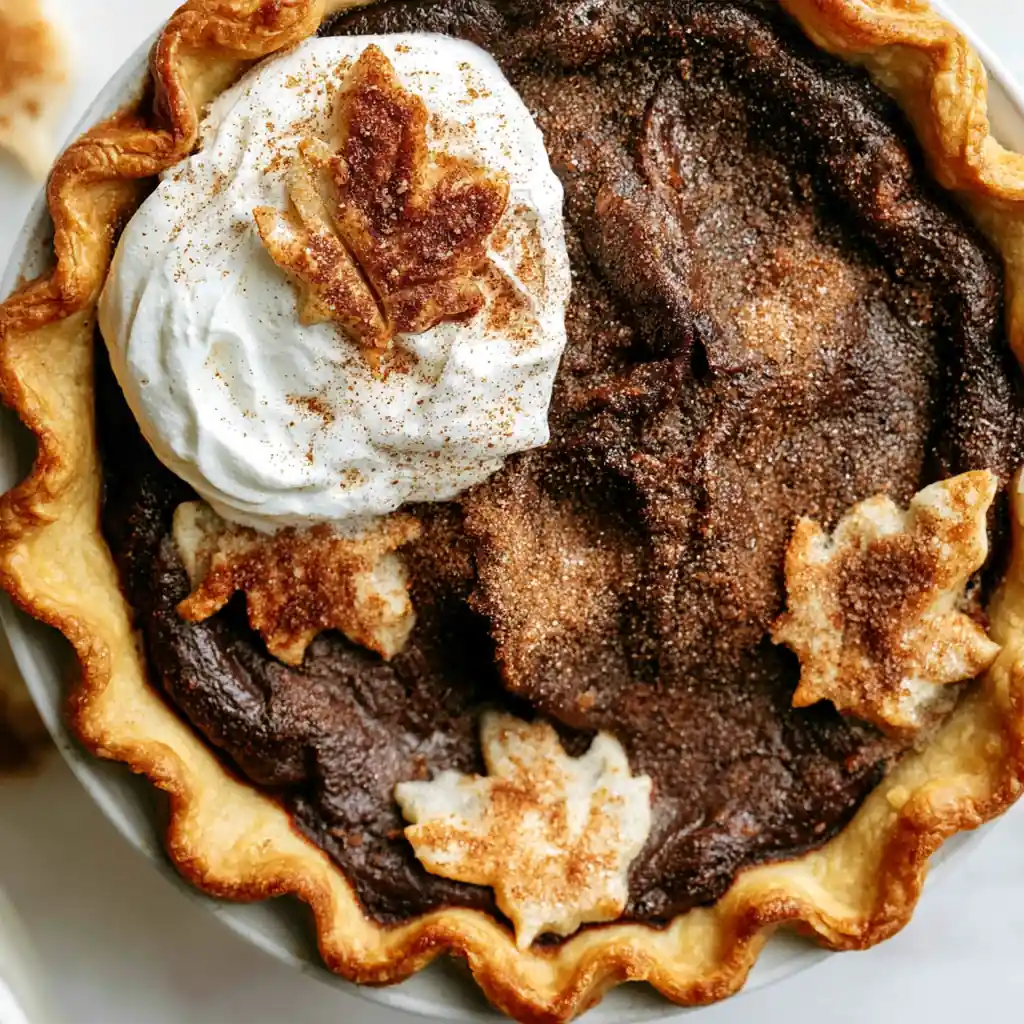
Apple Butter Pie brings rich orchard flavor to a silky custard filling made for cool evenings and holiday tables. Instead of filling the crust with sliced apples, this recipe combines concentrated apple butter with eggs, brown sugar, sweetened condensed milk, cinnamon, and vanilla. The finished pie tastes warm, creamy, and familiar, yet it offers a delicious change from traditional apple pie. A sparkling cinnamon sugar topping adds gentle crunch, while a flaky homemade crust supports every smooth slice. Serve this beautiful fall dessert chilled with whipped cream for Thanksgiving, Christmas, or any gathering that calls for comforting apple flavor.
Story
I start thinking about Apple Butter Pie as soon as fall baking season arrives and jars of spiced apple butter appear in the pantry. Traditional apple pie always feels welcoming, but peeling, coring, and slicing several apples can slow down an already busy holiday cooking day. Apple butter creates the same cozy mood with less fruit preparation because it already contains concentrated apple flavor and fragrant spices. Once blended into a custard, it produces a texture similar to pumpkin pie while keeping its own sweet, tangy character. This Apple Butter Pie also works beautifully as a make-ahead Thanksgiving dessert. The filling needs time to cool and set, so you can bake the pie the night before dinner and add whipped cream before serving. Meanwhile, the homemade gluten free dough creates tender, buttery layers without feeling fragile or dry. Sour cream adds moisture, while cold butter creates flaky pockets as the crust bakes. Decorative pastry leaves make the finished pie look festive, although you can skip them when time feels tight. Cinnamon sugar connects every component by coating the pastry decorations and forming a lightly crisp layer over the custard. Therefore, each bite delivers flaky crust, creamy filling, warm spice, and concentrated apple flavor in balanced proportions.
Ingredients
For the crust, gather 2 1/2 cups (345 grams) gluten free 1-to-1 baking flour, 1 tablespoon granulated sugar, 1/2 teaspoon salt, 1 cup (220 grams) cold unsalted butter cut into cubes, 1/4 cup ice water, and 1/4 cup (60 grams) sour cream. For the filling, use 1 cup (270 grams) apple butter, 3 large eggs, 1/4 cup (50 grams) packed dark brown sugar, 1 tablespoon gluten free 1-to-1 baking flour, 1/2 teaspoon ground cinnamon, 1/2 teaspoon salt, one 14-ounce can sweetened condensed milk, and 1 teaspoon vanilla extract. For the cinnamon sugar crust topping, combine 1 1/2 tablespoons granulated sugar with 3/4 teaspoon ground cinnamon. Finally, have homemade or store-bought whipped cream ready for serving. Keep the butter and water cold until you mix the dough because warm butter will blend into the flour rather than forming flaky layers. Choose a thick, strongly flavored apple butter since it supplies most of the fruit flavor in this creamy custard pie. Check that your flour blend contains xanthan gum so the pastry holds together while rolling.
Step-by-Step Instructions
Follow the preparation and baking stages in order, since chilling the dough, partially baking the shell, and cooling the finished pie all contribute to clean slices. Begin with cold ingredients and give the dough at least one hour in the refrigerator. Next, shape and partially bake the crust before adding the custard. This step dries the surface and reduces the chance of a soggy bottom. Afterward, mix the filling gently so you do not beat unnecessary air into the eggs. Bake the filled shell first at 400°F, then lower the temperature to 350°F. The initial heat helps the crust stay crisp, while the lower heat cooks the custard gradually. Finally, cool the pie completely before cutting it.
Preparing the Ingredients
Whisk the gluten free flour, sugar, and salt in a large bowl. Add the cold butter cubes and toss until flour coats each piece. Work the butter into pea-sized pieces with your fingers, two forks, or a pastry cutter. Pour in the ice water, stir briefly, and then mix in the sour cream. Press the mixture together with your hands. Add extra water one tablespoon at a time only when the dough remains powdery. Divide the dough into two portions, making one slightly larger for the shell. Shape both portions into one-inch-thick disks, wrap them, and refrigerate for at least one hour. Let the larger disk rest at room temperature for ten minutes, then roll it on a generously floured surface until it measures about one inch wider than a nine-inch pie dish. Transfer it to the dish, patch any cracks, tuck the overhang underneath, and crimp the edge. Separate one egg. Reserve its yolk for the filling, then brush its white across the bottom and sides of the shell. Freeze the shell for fifteen minutes. Meanwhile, roll the smaller disk and cut decorative leaves, if desired.
Cooking Instructions
Preheat the oven to 400°F. Line the frozen shell with crumpled parchment paper and fill it with pie weights or dry beans. Bake the shell and pastry leaves for fifteen minutes. Remove golden leaves as needed, then remove the weights and parchment. Continue baking the shell for five to eight minutes, until the center no longer looks raw. Mix the topping sugar and cinnamon, then toss the warm leaves with a small portion. Reserve the remaining cinnamon sugar. Let the shell cool slightly. In a large bowl, whisk the apple butter with two whole eggs, the reserved yolk, and dark brown sugar. Whisk in the flour, cinnamon, and salt. Add the sweetened condensed milk and vanilla, then mix until smooth. Pour the filling into the shell and sprinkle the remaining cinnamon sugar evenly over it. Bake for ten minutes at 400°F. Reduce the oven to 350°F without opening the door, then bake for another thirty to forty minutes. The outer filling should look set, while the center should wobble slightly when you move the dish. Cool at room temperature for thirty minutes. Refrigerate uncovered for at least two hours, although four hours or overnight gives the custard a firmer texture.
Tips for Perfect Results
Temperature control makes the greatest difference in this recipe. Keep the butter cold while preparing the dough, freeze the shaped shell before baking, and let the completed pie cool fully before slicing. When choosing apple butter, look for a smooth product with a deep brown color and pronounced apple flavor. Some brands contain more sugar or spice than others, so taste yours before mixing the filling. If it tastes extremely sweet, use slightly less brown sugar. Also, place the pie dish on a rimmed baking sheet before filling it. The sheet catches accidental spills and makes moving a full pie much easier. Use a sharp, thin knife for cutting, and wipe the blade between slices.
Common Mistakes to Avoid
Do not let the butter soften while you prepare the crust. Melted butter coats the flour and creates a dense texture instead of flaky layers. Likewise, do not add too much water to gluten free dough. The mixture may look crumbly at first, but it often comes together once you press it firmly. Avoid skipping the partial bake because the liquid custard can leave an unbaked shell soft and gummy. The egg white coating also matters because it forms a useful barrier between the crust and filling. When mixing the custard, whisk only until the ingredients look smooth. Aggressive mixing creates bubbles that may rise and mark the surface. Most importantly, do not bake until the center becomes completely rigid. Custard continues to firm as it cools, so remove the pie when the middle still has a controlled wobble. Finally, resist slicing the pie while warm. Early cutting can release a loose filling and prevent clean portions.
Pro Tips for Better Flavor
Use dark brown sugar rather than light brown sugar because its deeper molasses flavor supports the spiced apple butter. European-style butter contains slightly less water and often creates a richer crust, although regular unsalted butter still works well. Add a small pinch of nutmeg or ground cloves when your apple butter tastes mild, but keep the extra spice restrained so cinnamon and apple remain dominant. For a polished finish, pipe whipped cream around the edge rather than covering the center. This presentation leaves the cinnamon sugar surface visible. You can also flavor the whipped cream with vanilla, maple syrup, or a small amount of cinnamon. Decorative pastry leaves provide extra crisp texture, especially when coated while warm. However, simple cutouts such as stars or circles work equally well. For deeper contrast, serve each slice with tart apple slices or lightly salted pecans. Their fresh acidity or savory crunch balances the sweet custard.
Serving and Storage
This pie tastes best after a long chill because the custard becomes smooth, firm, and easy to cut. Keep it refrigerated until shortly before serving, especially when your kitchen feels warm. Since the filling contains eggs and dairy, return leftovers to the refrigerator promptly. A nine-inch pie yields eight generous slices or ten smaller holiday portions. The richness makes modest slices satisfying, particularly after a large meal. For a neat dessert table, arrange pastry leaves and whipped cream immediately before serving. That way, the leaves stay crisp and the cream keeps its shape.
How to Serve
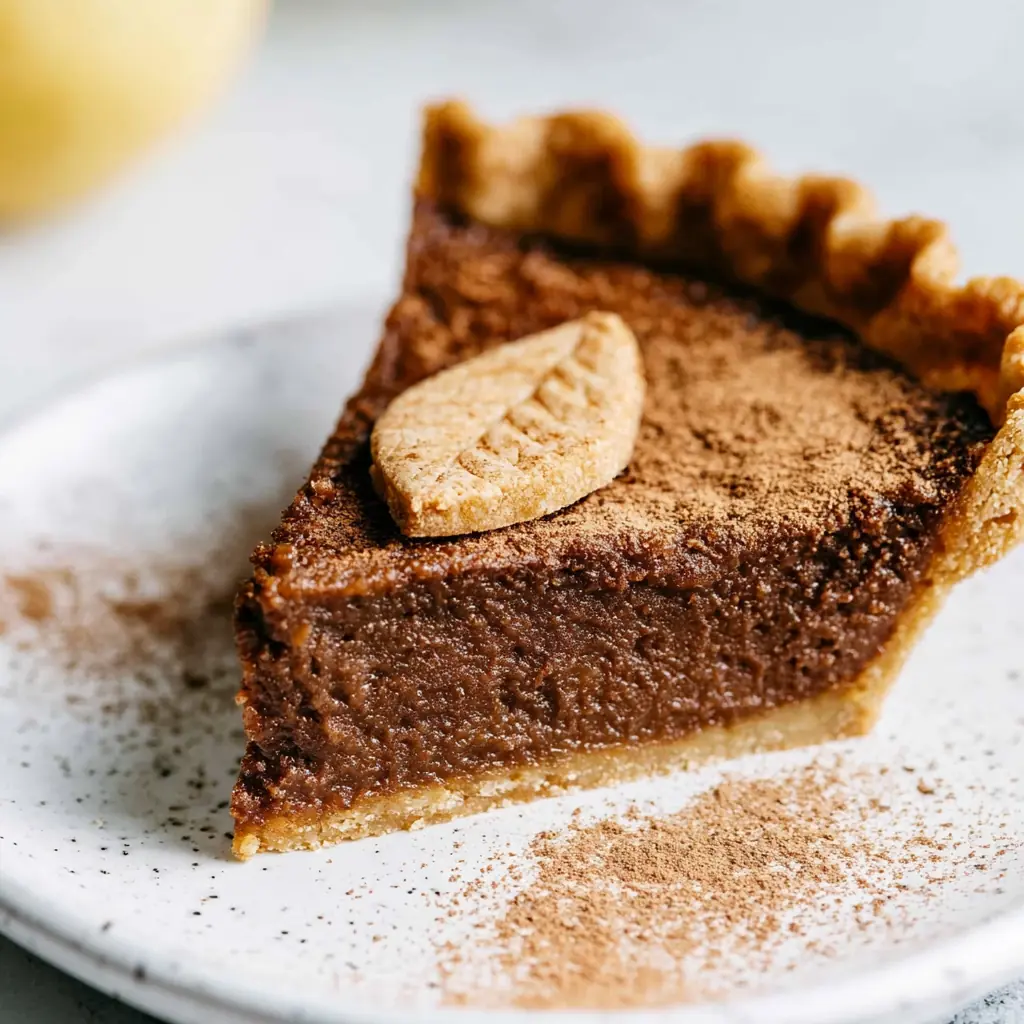
Serve Apple Butter Pie chilled or let it stand at room temperature for fifteen minutes to soften the texture slightly. Add a spoonful or piped swirl of whipped cream to each slice. Next, place a cinnamon sugar pastry leaf on top for a festive finish. A light dusting of cinnamon looks attractive, although too much can taste dry. For Thanksgiving, pair the pie with coffee, black tea, hot cider, or a small scoop of vanilla ice cream. The recipe also fits a fall brunch when served beside fresh fruit and coffee. Because the filling already tastes sweet and creamy, avoid heavy caramel sauce unless you prefer a particularly rich dessert. Instead, a few chopped toasted pecans can add contrast without hiding the apple flavor.
How to Store Leftovers
Cover leftover pie loosely with plastic wrap or place individual slices in airtight containers. Refrigerate them for up to four days. To protect the decorative leaves from moisture, store them separately at room temperature in a sealed container, then add them when serving. The custard tastes good directly from the refrigerator, so reheating remains optional. However, you may let a slice sit at room temperature for ten to fifteen minutes when you prefer a softer filling. Freezing can slightly change the custard texture, so refrigeration gives the best result. When freezing becomes necessary, wrap fully chilled slices in plastic wrap and foil, then freeze them for up to one month. Thaw the slices overnight in the refrigerator without unwrapping them. Add fresh whipped cream after thawing rather than freezing the topping with the pie.
Conclusion
Apple Butter Pie turns a jar of spiced apple butter into an impressive holiday dessert with silky custard, flaky pastry, and a sparkling cinnamon sugar finish. Although the recipe includes several chilling and baking stages, each one remains straightforward and contributes to better texture. Prepare the pie ahead, let it set overnight, and decorate it shortly before your guests arrive. Once you taste the creamy apple filling against the crisp, buttery crust, this recipe may earn a permanent place beside your favorite Thanksgiving classics.
Discover more delicious recipes by following me on Facebook and Pinterest.
Frequently Asked Questions
Can I Use a Store-Bought Pie Crust?
Yes, you can use a refrigerated or frozen gluten free pie crust when you need a faster option. Follow its package directions for partial baking, then brush the interior with egg white before adding the filling. A store-bought crust may brown faster than homemade dough, so cover its edge with foil or a pie shield during the second baking stage. You can also skip the pastry leaves or cut simple decorations from an extra sheet of prepared dough.
How Do I Know When the Custard Has Finished Baking?
The filling has finished baking when the outer two or three inches look firm and slightly puffed while the center still moves like soft gelatin. It should not ripple like liquid. An instant-read thermometer inserted near the center should register about 175°F. Remove the pie before the center looks completely solid because retained heat continues cooking the eggs. As the pie cools and chills, the custard contracts slightly and develops its final sliceable consistency.
Can I Make Apple Butter Pie Ahead of Time?
Yes, this recipe works particularly well as a make-ahead dessert. Bake and cool the pie one day before serving, then refrigerate it uncovered until cold. Once the surface has chilled, cover the dish loosely so condensation does not drip onto the cinnamon sugar topping. Keep whipped cream and pastry leaves separate until serving time. The rested pie often cuts more cleanly the next day, and its apple, vanilla, brown sugar, and cinnamon flavors become more unified.

Apple Butter Pie
- Total Time: 5 hours 40 minutes
- Yield: 8-10 slices 1x
- Diet: Gluten Free
Description
This creamy Apple Butter Pie combines a silky spiced custard, flaky homemade gluten free crust, and crisp cinnamon sugar topping. Chill it thoroughly and serve with whipped cream for a festive fall or Thanksgiving dessert.
Ingredients
- 2 1/2 cups (345g) gluten free 1-to-1 baking flour
- 1 tablespoon granulated sugar
- 1/2 teaspoon salt
- 1 cup (220g) cold unsalted butter, cubed
- 1/4 cup ice water, plus more as needed
- 1/4 cup (60g) sour cream
- 1 cup (270g) apple butter
- 3 large eggs, divided
- 1/4 cup (50g) packed dark brown sugar
- 1 tablespoon gluten free 1-to-1 baking flour
- 1/2 teaspoon ground cinnamon
- 1/2 teaspoon salt
- 14 ounces sweetened condensed milk
- 1 teaspoon vanilla extract
- 1 1/2 tablespoons granulated sugar
- 3/4 teaspoon ground cinnamon
- Whipped cream, for serving
Instructions
- Whisk 2 1/2 cups gluten free flour, 1 tablespoon sugar, and 1/2 teaspoon salt in a large bowl.
- Add the cold butter cubes and work them into the flour until pea-sized pieces remain.
- Stir in the ice water and sour cream. Press the dough together, adding water 1 tablespoon at a time only if needed.
- Divide the dough into two portions, with one portion slightly larger. Shape both into disks, wrap tightly, and refrigerate for at least 1 hour.
- Let the larger dough disk rest for 10 minutes. Roll it on a well-floured surface until about 1 inch wider than a 9-inch pie dish.
- Transfer the dough to the dish, press it against the bottom and sides, patch cracks, tuck the overhang underneath, and crimp the edge.
- Separate one egg. Reserve the yolk for the filling and brush the egg white over the bottom and sides of the crust.
- Freeze the prepared pie shell for 15 minutes.
- Preheat the oven to 400°F. Roll the smaller dough disk and cut decorative pastry leaves, if desired. Refrigerate the leaves.
- Line the frozen pie shell with crumpled parchment paper and add pie weights or dry beans.
- Bake the shell and pastry leaves for 15 minutes. Remove any golden leaves, along with the pie weights and parchment.
- Bake the empty shell for another 5 to 8 minutes, until the center no longer looks raw.
- Combine 1 1/2 tablespoons sugar with 3/4 teaspoon cinnamon. Toss the warm pastry leaves with some of the mixture and reserve the remainder.
- Whisk the apple butter, 2 whole eggs, reserved egg yolk, and dark brown sugar in a large bowl.
- Whisk in 1 tablespoon gluten free flour, 1/2 teaspoon cinnamon, and 1/2 teaspoon salt.
- Add the sweetened condensed milk and vanilla, then whisk just until smooth.
- Pour the filling into the partially baked shell and sprinkle it with the remaining cinnamon sugar.
- Bake for 10 minutes at 400°F. Reduce the temperature to 350°F and bake for 30 to 40 minutes, until the edges set and the center gently wobbles.
- Cool the pie at room temperature for 30 minutes. Refrigerate uncovered for at least 2 hours, preferably 4 hours or overnight.
- Top with whipped cream and cinnamon sugar pastry leaves before slicing and serving.
Notes
- Keep the butter, ice water, and shaped crust cold for the flakiest pastry.
- Use a gluten free flour blend that contains xanthan gum.
- Choose thick, flavorful apple butter because it provides the main apple flavor.
- Do not overmix the custard or bake it until completely rigid.
- Store the refrigerated pie for up to 4 days.
- Store decorative pastry leaves separately so they remain crisp.
- Prep Time: 1 hour
- Cook Time: 40 minutes
- Category: Dessert
- Method: Baking
- Cuisine: American
Nutrition
- Serving Size: 1 slice
- Calories: 612
- Sugar: 39
- Sodium: 336
- Fat: 35
- Saturated Fat: 22
- Unsaturated Fat: 11
- Trans Fat: 1
- Carbohydrates: 69
- Fiber: 2
- Protein: 8
- Cholesterol: 156